Vintage Woodworks
Architectural Details Direct - 903-356-2158
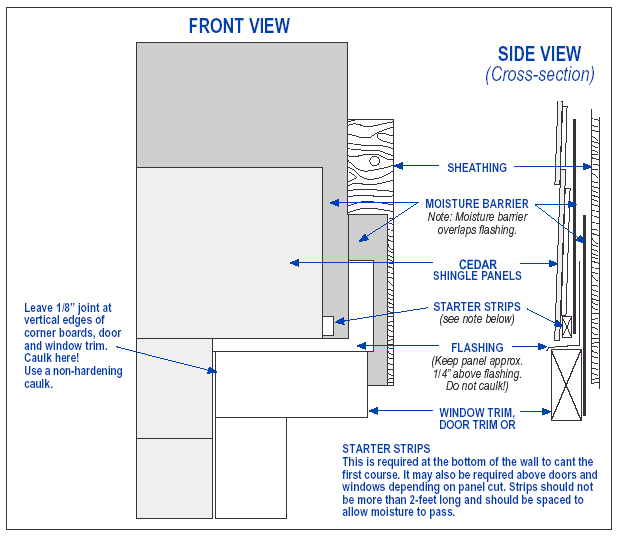
Home Contact Us Help Shipping Shopping Cart 903-356-2158 Porches Doors Gables Brackets BeadBoard Mouldings Azek Photos Our Story Guarantee Customer Comments Product Options A-Z Index Pictorial IndexHome > Products > Shingle Siding > Cedar Shingles > Info - Cedar Shingles > Cedar Shingle FlashingCedar Shingle Flashing Flashing should be made from a non-corrosive material and should extend a minimum of 2" vertically up the wall. Flashing must be overlapped by the moisture barrier. Cedar Shingle Siding must never rest on the horizontal surface of flashing. Otherwise, it is possible for water to wick up the Shingles and into the wall. Therefore, Shingles should be a minimum 1/4" above the horizontal surface of the flashing. Shingles should be a minimum of 1" above roof flashing at all roof-to-wall junctures. Caulk should be used only on vertical joints where Shingles meet doors, windows, and corner boards; and at the bottom of window ledges or other protrusions to prevent any water flow off the window from entering the wall. Only a non-hardening caulk that will expand and contract should be used.  |
|
| |||
| RELATED PAGES | |||
 Info - Cedar Shingles | |||
 Cedar Shingle Panels | |||
Cedar Sidewall Shingles | |||
 Cedar Shingle Panel Installation | |||
Making Cedar Shingle Corners | |||
Staining and Finishing Cedar Shingles | |||
 Usage Photos - Cedar Shingles & Panels | |||