Vintage Woodworks
Architectural Details Direct - 903-356-2158
Home Contact Us Help Shipping Shopping Cart 903-356-2158 Porches Doors Gables Brackets BeadBoard Mouldings Azek Photos Our Story Guarantee Customer Comments Product Options A-Z Index Pictorial IndexCedar Shingle Panel InstallationShingle Panels from Vintage Woodworks may be applied: • Over solid nailable sheathing • Over insulative board • Over spaced sheathing Coverage Each Panel is 96" long x 8-1/4" tall overall and is designed to overlap the panel below it by 1-1/4". This provides 7� exposure per course and concealed nailing. Each bundle of 8 Panels covers 37 square feet so 2.7 bundles covers 100 square feet. Weather Barrier Apply a suitable weather-resistive barrier, such as Type 15 felt or better, in accordance with local code requirements. Use a two-inch head lap and six-inch end lap when fastening barrier. 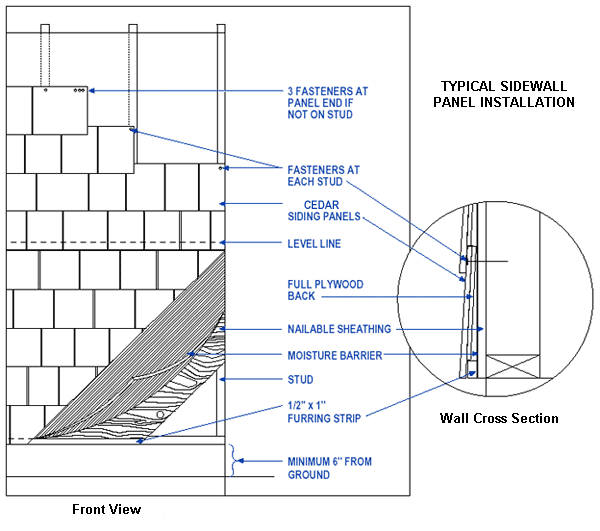 Level Line Establish a level line around building. Use a transit, water level or level line and string. Mark the level line about four feet off the ground or at any convenient height. Then simply measure down from the level line to position the first siding course. Begin by nailing a 3/8" x 1" furring strip along the bottom of the house. Keep siding at least 6" from the ground. Flashing Proper flashing and caulking are essential. Keep the bottom edge of panels a minimum 1/4" above flashing ledge. At roof junctures, siding should be a minimum 1" above roofing material. Refer to your local building code for stricter guidelines, and see our information page on Cedar Shingle Flashing for more information and details.  Alignment Alignment Align panel ends with corner stud or corner board. Be sure that the Corner is plumb in both directions. Install the first course of siding. The bottom of each panel sits on top of the previous panel so each course goes up easily, maintaining a consistent exposure. Trim the over-lap of the panel's left end or the under-lap on the panel's right end when butting to window and door trim or corners. Nailing Vintage Woodworks recommends using a corrosion resistant (hot dipped galvanized or stainless steel) 1-3/4" roofing nail for blind nailing. Nails should always be of sufficient length to penetrate the studs a minimum 3/4". Special applications or high wind loads may require optional fasteners. A pneumatic nail gun will speed up application, but when power nailing care should be taken to set the head flush with the Shingle. Sinking the heads into the Shingles can affect the long-term performance of the siding. Staples are not recommended. Position nails at the studs. Nail on or below the nailing line which is 7/8" from the top edge of the 7" exposure panels and 3/4" from the top edge of the 4-1/2" exposure panel. Always put one nail 1/2" from the ends of each panel. If the panel ends miss a stud, place three nails approximately 1" apart at the panel end. Nail each course of panels from one end to the other, maximum 16" on center. Never nail from both ends toward the middle. Do not force panels into place. First Course Nail up the first (bottom most) course of siding, taking care that this first course is perfectly straight and level. Allow 1/16" spacing at overlocking end joints to allow for expansion. Allow 1/8" spacing where panels butt against windows and doors, caulk these joints with non-hardening caulking compound. Subsequent Courses Each course of panels will automatically align when laid up. Level should be checked occasionally. Panel end joints should be offset 16 or 24 inches from previous courses. Cutting When it comes time to cut a panel, use a portable circular saw and place the panel face down to prevent splintering. Make sure the cut is square. You may cut several panels at once to speed application. Top Course Chances are you'll probably have to rip the last siding course to fit. This top course will have to be face nailed, or a trim board can be attached to cover the siding nails. Curved Surfaces Shingle Panels may be applied to slight curves over solid nailable sheathing if each shingle on the panel is nailed with two fasteners 3/4" from each edge, 3/4" to 1" from the top. Mansard Applications Where codes permit, Shingle Panels may be applied to mansard-style roofs of at least 20/12 pitch (60�) over ASTM Type 30 building paper. |


